If you’re a social media marketer, you probably already have a social media content calendar. It was probably one of the first things you built when you started you role. But the question isn’t simply whether you have a social media content calendar or not — it’s whether your social media content calendar is doing enough for you.
When you invest significant time in structuring your calendar, it does more than just list dates — it becomes a reflection of your overall strategy. A great social media content calendar allows you to:
- Track your organic efforts and paid advertising campaigns
- Mark important brand dates such as product launches, special events, or activations
- Incorporate holidays and industry-specific celebrations
- Distribute content across the right social media platforms
- Develop the right mix of content types
- Avoid repetition and maintain audience interest
- Check if your content provides value through educational insights, entertainment, or inspiration
- Experiment with new content parameters, such as posting times, formats, and messages
Building a calendar at this level involves more than inputting a post schedule. Before you start building your first month’s schedule, you need to make several upfront decisions about what kind of content you’ll post, how to organize and schedule the content, and who is responsible for what steps in the process. That’s why we’ve broken this guide into two major parts: creating the calendar and managing it.
Part 1: Creating a social media content calendar - This section will help you build your calendar, including all the foundational elements like platforms, post types, value and content pillars, and a baseline posting schedule. We’ll also walk you through picking the right calendar management tool.
Part 2: Managing a social media content calendar - This section will help you use your calendar to manage social media content in a straightforward and repeatable workflow. We’ll cover everything from ideation and planning, to approvals and scheduling, to community management and performance analysis.
Let’s get started with basics.
What is a social media content calendar?
A social media content calendar is a content planning and scheduling tool used by social media marketers. It displays all of your upcoming social media content, usually in a monthly calendar view. If you search for social media calendar examples, you'll notice that they can look wildly different. This is based on the platform you're using to create it, and how you manage your content.
Even the most basic social media calendar should give you a bird’s eye view of your content plans, including:
- What content is being published, (i.e. the name of the post or content topic)
- When the content is being published (i.e. the date and time)
- Where the content is being published (i.e. the social media platforms)
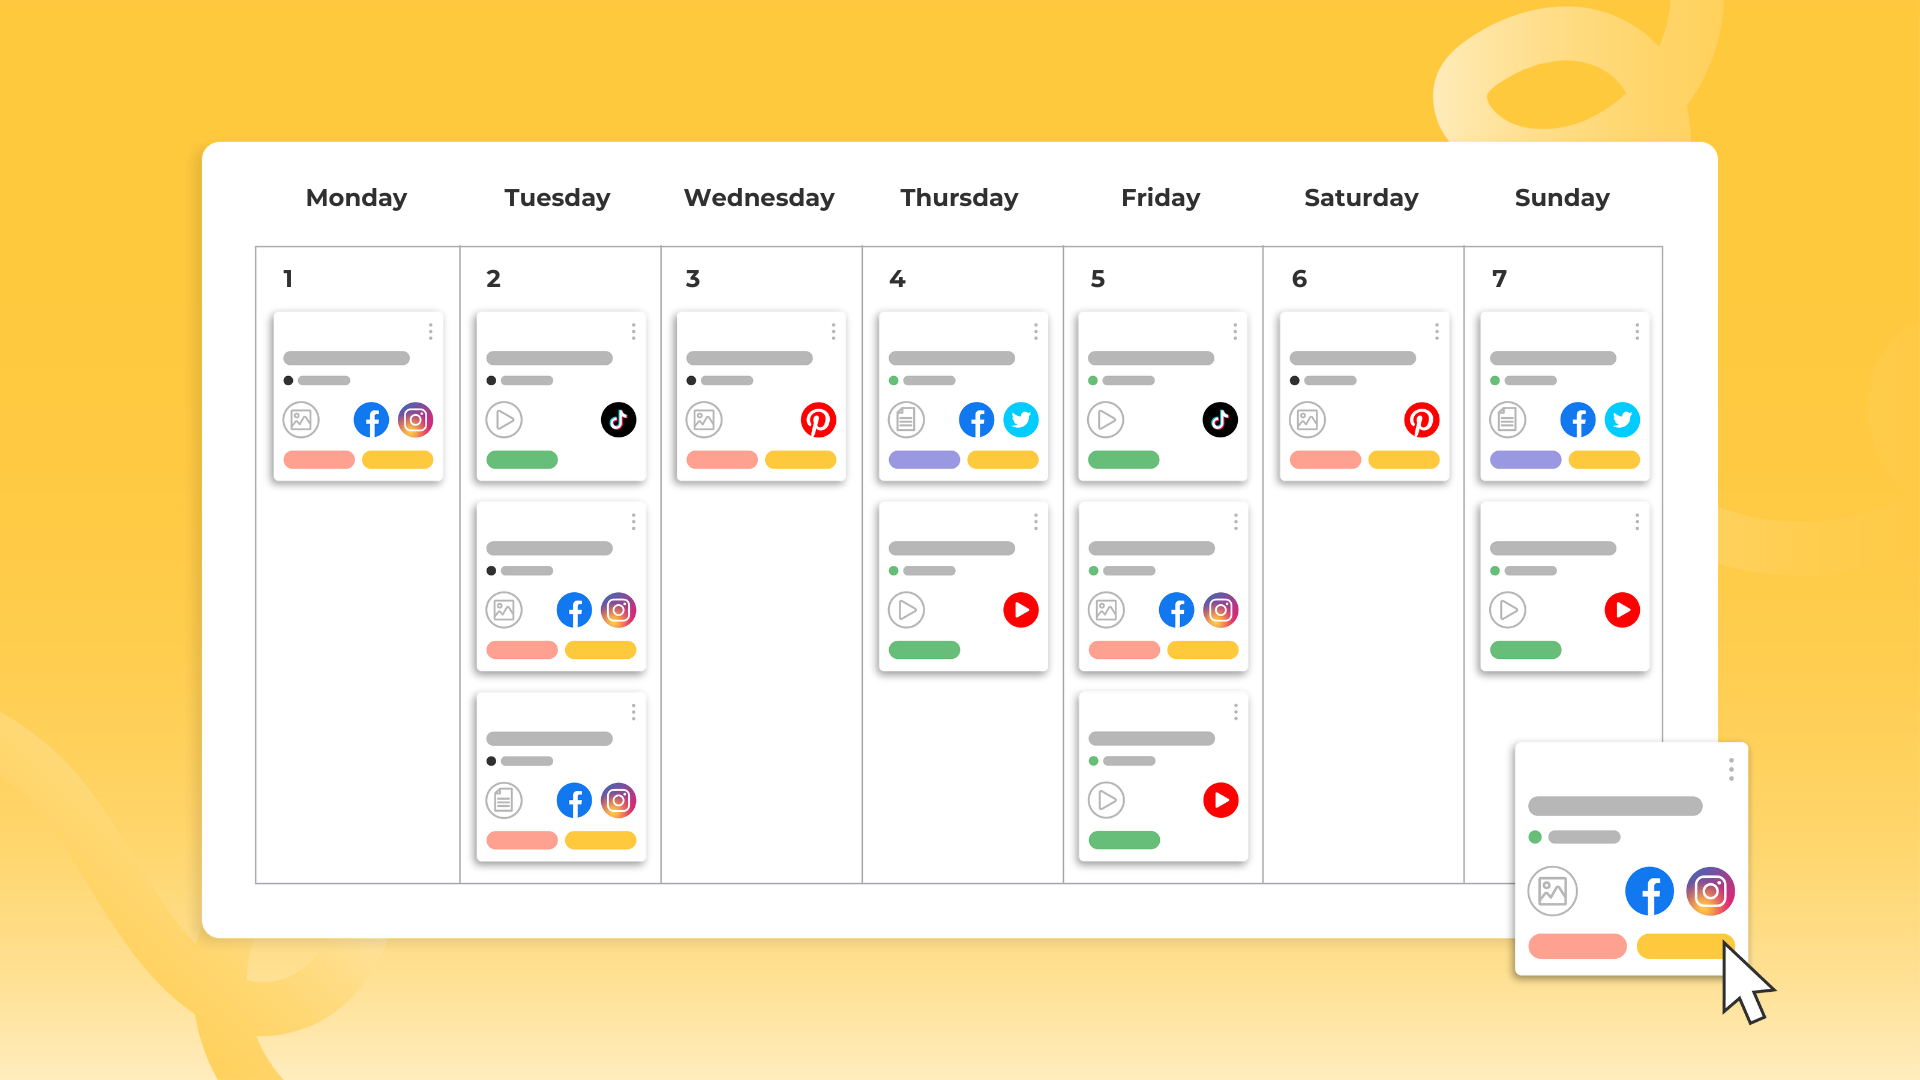
 Example of a social media content calendar made with Loomly
A calendar is foundational to social media marketing and often becomes the most important tool in any social media manager’s toolkit. It acts as both a historical record of your content and a roadmap of what’s to come. You’ll use it to in almost every aspect of social media marketing:
- Ideating and brainstorming content
- Testing new channels and formats
- Planning multi-channel campaigns or single posts
- Scheduling content within optimized timeframes
- Tracking deliverables and ensuring project completion
- Communicating with your team and stakeholders
- Reporting on social media performance
Managing multiple platforms, content formats, campaigns, and potentially multiple brands or client accounts can feel like you’re caught in a tornado every day of the week. A social media calendar is your calm in the chaos — a place where everything is laid out neatly and you know exactly what’s coming.
Why use a social media content calendar?
Nearly every brand — from startups and small businesses to agencies and larger organizations — can benefit from a social media calendar. Here’s how it can help:
Freelancers and agencies: When managing multiple clients or accounts, a social media calendar system allows you to create separate calendars for each client with specific rules and guidelines tailored to their unique strategies and brand identities. By having a clear workflow housed within dedicated calendars, you can easily collaborate on content creation, share progress, and manage approvals.
Startups: Every post counts when you’re at a startup, and a social media calendar helps you make the most of each one. By tracking important audience metrics, you can analyze the success of your posts and adjust your strategy accordingly. This means you can pivot quickly to better connect with your target audience.
Small and medium businesses (SMBs): Time is a precious resource, especially for small and medium-sized businesses. A social media calendar saves time by helping you plan your content in advance. By organizing posts at the beginning of the month and working in batches, you can ensure a steady stream of content without the daily scramble to create something new.
Larger Companies: In larger organizations, where multiple teams might be involved in the content creation process, a social media calendar becomes crucial for editorial workflow and accountability. By coordinating with your social media team at every stage, you can ensure that everyone is on the same page.
No matter the size of your business or the scope of your social media efforts, a calendar will optimize your social media workflow so you can streamline content production, track data on successful (and unsuccessful) posts, and move into the next month armed with new insights and goals. A well-maintained calendar isn't just a planning tool; it's how you continually improve your social media strategy.
Part 1: How to create a social media content calendar
This first phase is closely tied to your social media strategy. If you haven’t documented one yet, now is the perfect time to outline your goals and develop a plan to achieve them with our guide to creating a social media strategy.
Once you have a working strategy to reference, the following steps will help you turn your goals and plans into actionable steps. We also cover these steps in our video tutorial on making a social media content calendar in under 10 minutes.
- Pick your value pillars
- Pick your content pillars
- Pick your platforms
- Pick your post types
- Figure out a posting schedule
- Pick a social media scheduling tool
- Build your calendar
Let's examine each step in detail.
Step 1: Pick your value pillars
Ask yourself this — what value do I want to bring to my audience? Value pillars represent the fundamental values, expertise, and goals of your brand. They shape the overall direction of your content strategy.
Choose your value pillars by focusing on areas that resonate with your audience and align with your brand’s mission. You’ll probably hit on many different values in the course of your content creation, but choosing two to focus on will help you maintain a consistent brand voice and ensure that your content delivers meaningful and relevant information.
The most common value pillars are:
- Educational: Content that teaches your audience something new.
- Inspirational: Content that resonates emotionally and encourages positive actions.
- Entertaining: Content that engages, amuses, and delights your audience.
- Relatable: Content that builds a sense of belonging through commonalities.
Step 2: Pick your content pillars
Content pillars are specific topics or types of content within each value pillar. For example, if one of your value pillars is educational content, your content pillars might include:
- How-to’s: Step-by-step instructions or tutorials on relevant topics
- Tips and tricks: Quick advice or hacks that are easy to consume
- Industry insights: In-depth analysis of industry trends
By defining your content pillars, you ensure that your social media calendar covers a range of topics within your niche while ensuring that all of your content provides some kind of value. Organizing your content into content pillars gives you a quick way to gauge what’s working and make more around that topic, type, or format.
Step 3: Pick your platforms
Now that you know what type of content you’re going to post, you’ll have a better idea of which platforms to use. Consider where your target audience spends their time and where your content will perform best. Here’s a brief overview of popular platforms and their strengths:
- Facebook: Great for community building, event promotion, and detailed content.
- Instagram: Best for visual content, including photos, videos, and stories. Perfect for showcasing brand identity and personality.
- Threads: Good for conversations and building community.
- X (Twitter): Suitable for real-time updates, news, and customer interactions.
- LinkedIn: Ideal for professional content, industry insights, and B2B marketing. Useful for thought leadership and networking.
- TikTok: Focuses on short, engaging videos. Excellent for reaching younger demographics and creating viral content.
- Pinterest: Great for visual inspiration, DIY ideas, and driving traffic to your website. Works well for niche markets.
There’s no need to be on every platform. You’ll have a much easier time generating results by giving your all to a few best-fit platforms than spreading yourself thin across all of them. Remember – increased reach does not automatically equal increased engagement. Choose platforms based on where your audience spends their time and the type of content your brand can confidently create.
Step 4: Pick your post types
Post types are essentially the format you’ll be posting in. You can absolutely test every possible format on social media — there’s no better way to gauge your audience’s interests. But we suggest you start with a handful of core post types based on the platforms you’ve chosen, your pillars, and the resources you have available.
For example, if you know your audience hangs out on TikTok, you already know short-form video is going to be your core post type. If your audience is moreso on LinkedIn, you can explore a few different effective post types on the platform, like text posts, image carousels, videos, and memes.
- Images: Visual content that grabs attention and conveys messages quickly. This can include carousel posts with multiple images of videos (like photo dumps).
- Videos: Engaging videos that can be informative, entertaining, or promotional
- Stories: Short-lived content (typically 24 hours) that features a mix of images and videos.
- Text: Think of this like microblogging – there might be supporting visuals, but the main communication is happening via a caption or a text post.
- Graphics and infographics: Visual representations of data or information that are easy to digest.
- Memes: Relatable and funny content formats that trend up quickly and die out just as fast.
- User-generated content: Content created by your audience that highlights their experiences with your brand.
Mix and match these post types to keep your content fresh and engaging, and align them with your content pillars and platforms.
Step 5: Figure out a posting schedule
Every business has a unique audience, which means every audience has a unique posting schedule. You can imagine that a business catering to parents will try to reach their audience at different times than a business catering to college students.
Platform usage also impacts posting schedule — a brand that’s all in on reels will probably post differently than a brand that uses social to share real-time updates.
That’s why you need to discover what posting times and frequency work for your brand through trial and error. Figuring out your posting schedule is a data-driven process that takes a bit of time, but it’s well worth the investment.
While every brand’s ideal social media calendar is different, posting at the right time does matter. Securing early engagement on your posts can mean significant boosts in the algorithm, which means more visibility immediately and in the long-term. Our guide to the best times to post on social media will give you a basic time frame for every channel before you figure out your unique schedule.
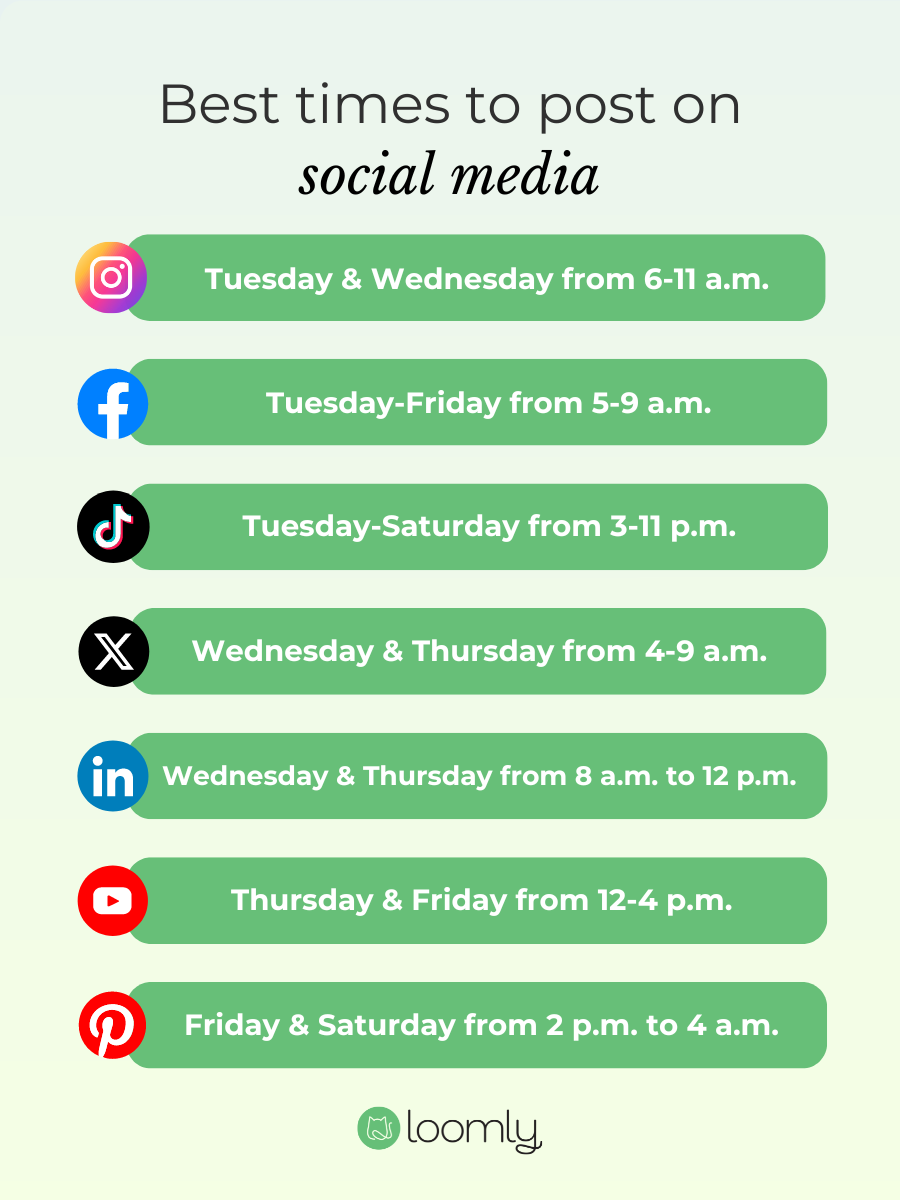 Best times to post on social media
Step 6: Pick the right social media scheduling tool
The right social media scheduling tool will help you streamline your content creation, scheduling, and analysis. You can manage simple schedules in a Google sheet or a similar lo-fi tool, but you’ll miss out on powerful calendar planning capabilities that help you work smarter, not harder.
When you’re shopping for a tool, look for features such as:
- Post scheduling and auto-publishing
- A visual content calendar for drag and drop planning (this is how most of us prefer to work)
- Integrations with all your chosen social media platforms
- Content creation tools and media library
- Analytics integrations and useful reporting features
- Custom roles and communication tools for team collaboration
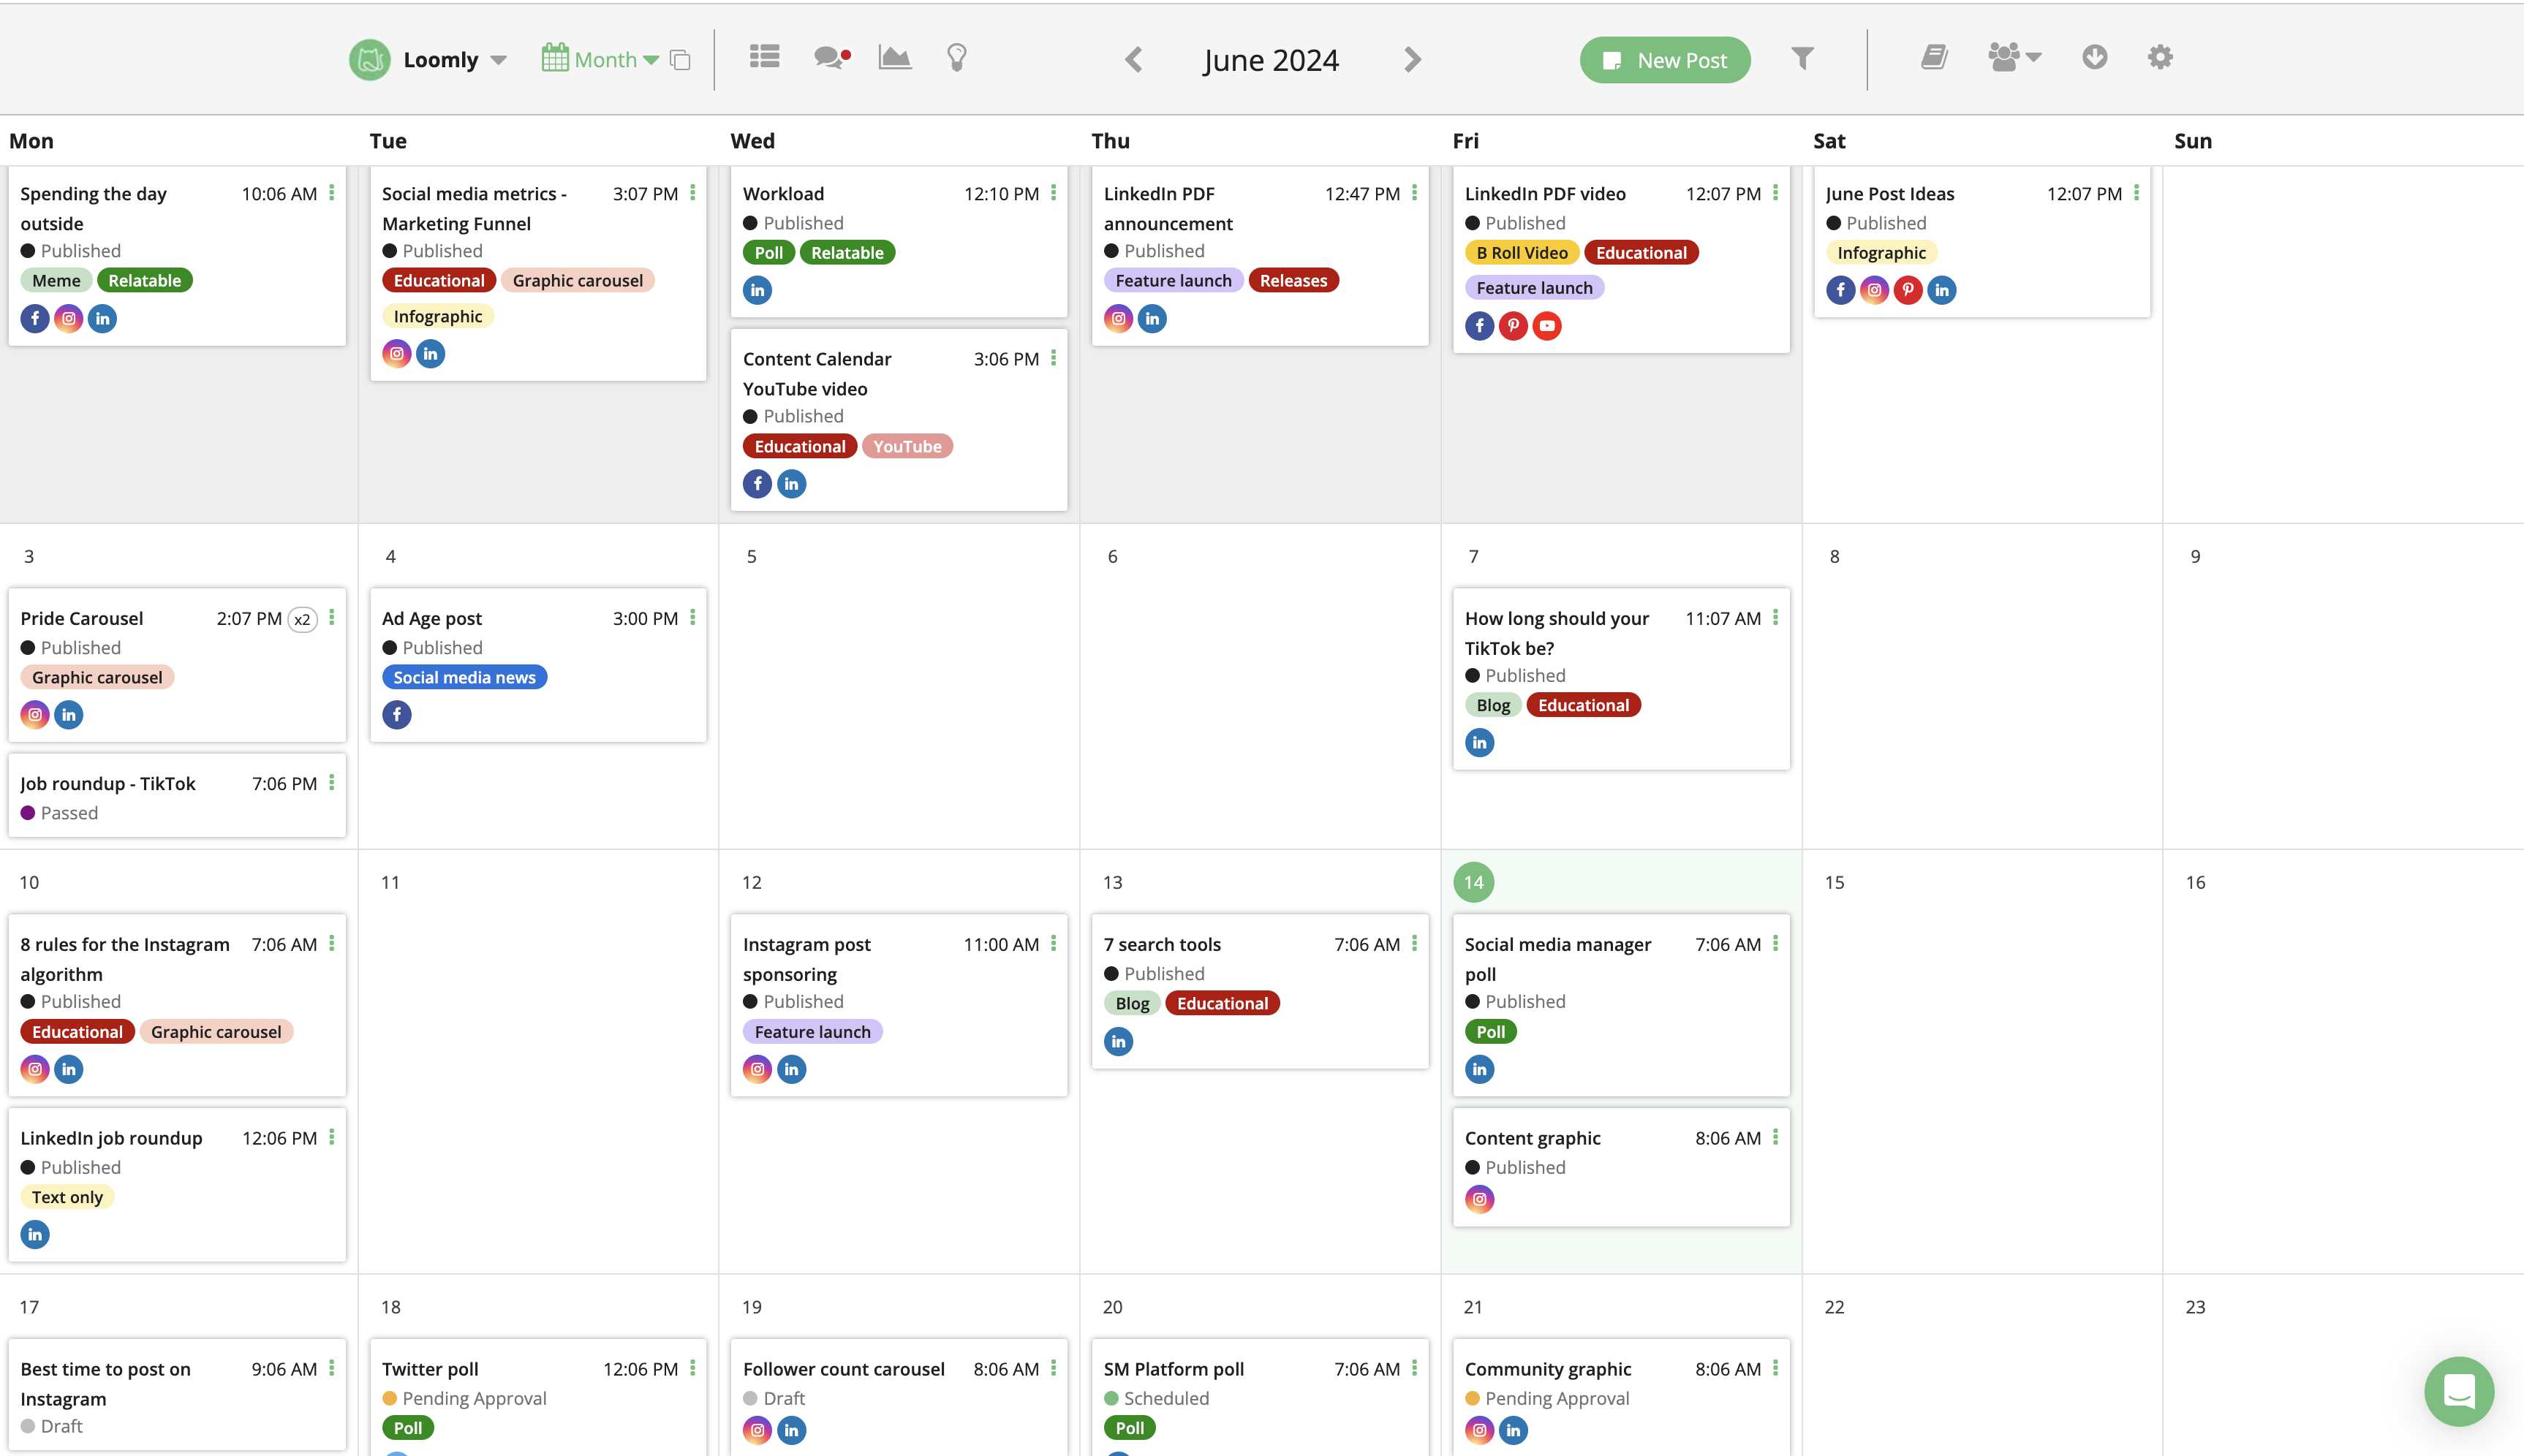
Every tool has features beyond these, so you’ll have to decide what features are instrumental to your content development. At Loomly, we focus on non-gimmicky features that make it easier to create, organize, collaborate, and publish content. For example, our custom post labels let you tag posts by the pillars and post types.
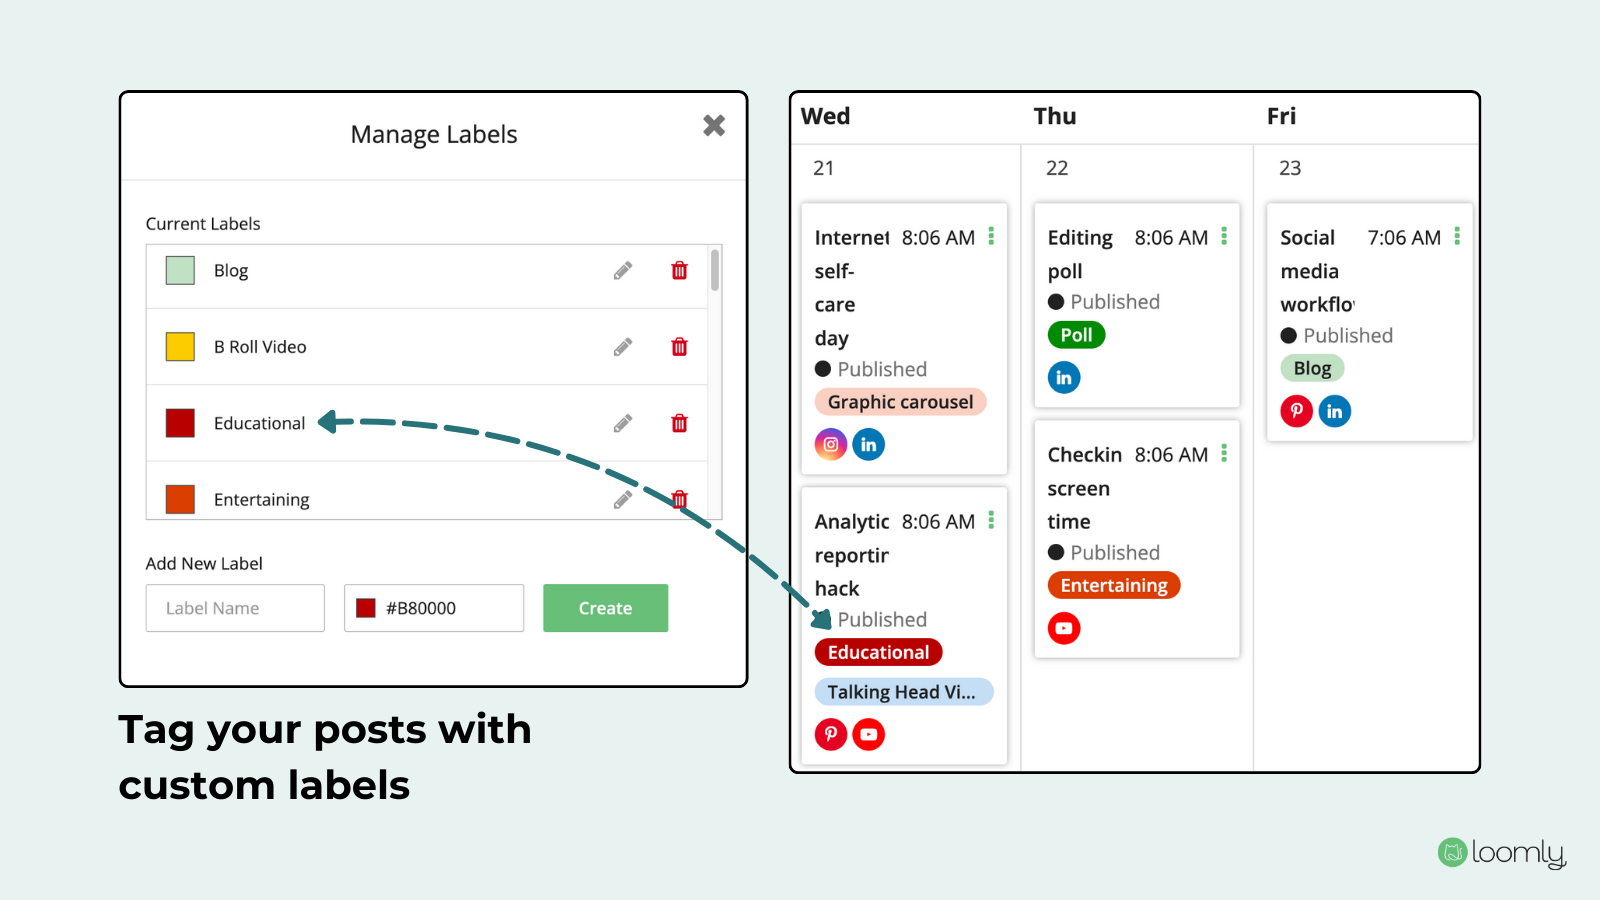 A popular Loomly feature is custom post labels, which you can use to tag your posts by topics, themes, types, or pillars
These tags show up on the calendar view, so at a glance you can be sure you have the right content mix to action on your strategy. Plus, you can filter your calendar view by these tags, as well as by platform. It’s simple features like these that make your daily calendar management 10x easier.
You can try Loomly free for 15 days — it only takes a few minutes to connect your first social account and star building a calendar.
Step 7: Build your calendar!
Let’s take stock of what we’ve decided. We know:
- What type of content we’re posting (and why) via our value pillars, content pillars, and post types
- Where we’re posting via our key platforms
- When we’re posting via our baseline schedule
- How we’re posting via our chose social media scheduling platform
Now you’re ready to build your calendar template. Whether using a spreadsheet, project management tool, or dedicated social media scheduling tool, create a system that allows you to plan and track content effectively. Your calendar should include:
- A color-coded key for content types and pillars
- A schedule layout with dates and times
- A clear workflow for planning, creating, and publishing content
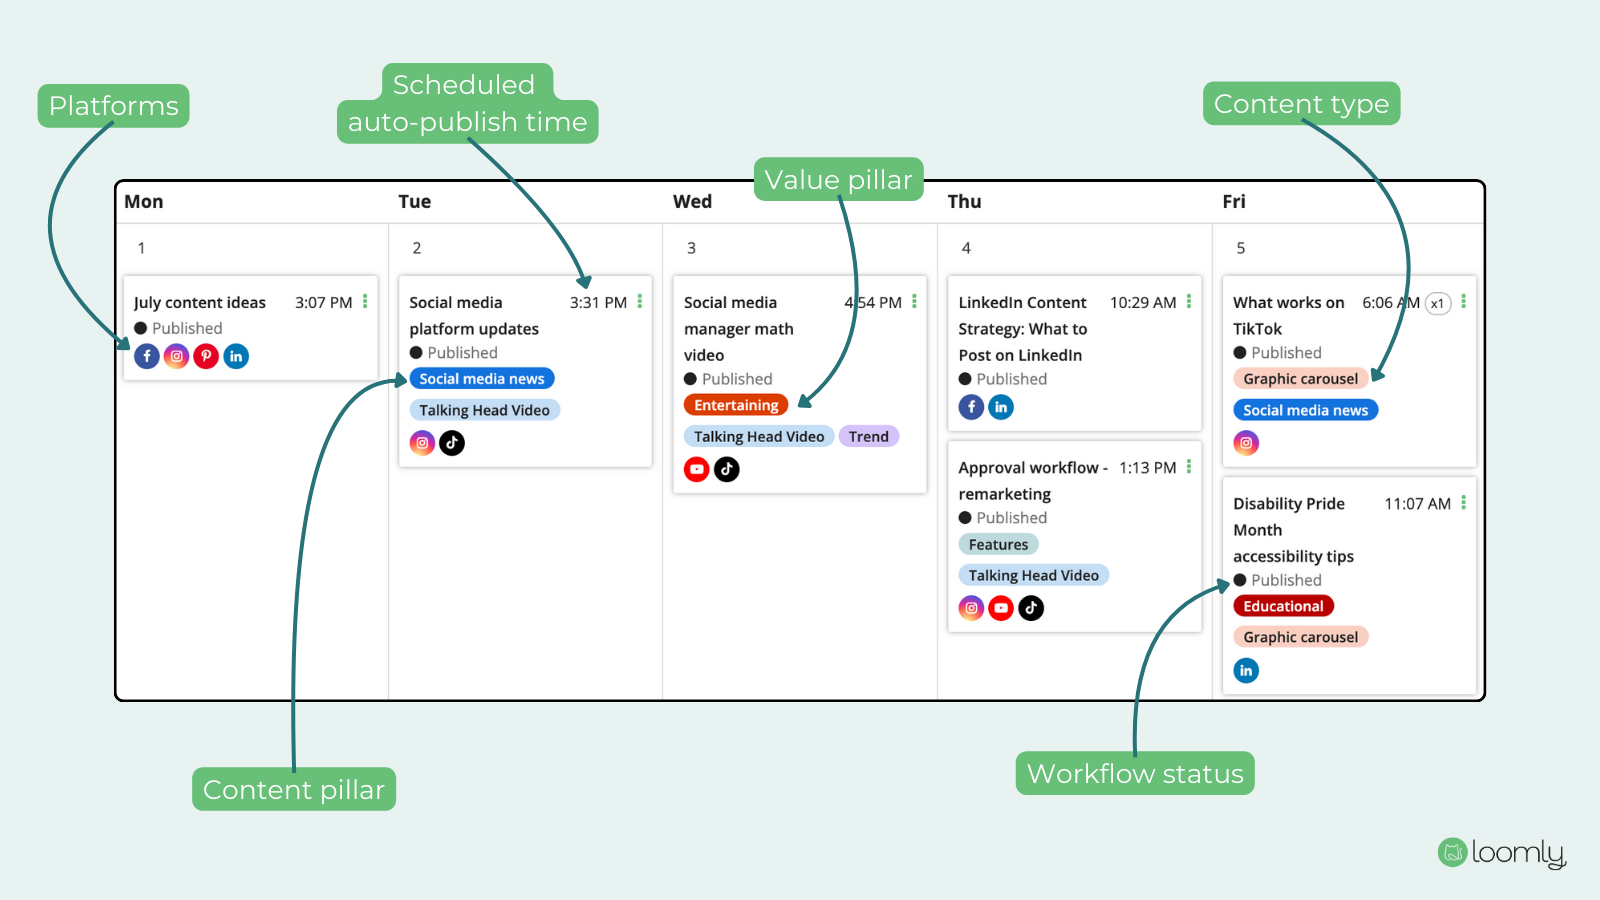 For each scheduled post, Loomly calendar view shows the platforms, scheduled date and time, and post status, along with any custom post labels.
Start your Loomly 15-day free trial and follow along with all of the steps we just walked through. By the end you’ll have a full-fledged social media content calendar that is firing off scheduled posts, collecting performance data, and freeing you up from hours of tedious manual tasks each week.
Phase 2: Managing your social media content calendar on a monthly basis
The hard part is over! You have a social media calendar system that you can mold and shape every month. Now it’s time to develop a workflow that takes you from ideation all the way to publishing and analysis. These steps are based on our 7-step social media workflow:
.png) How to manage your social media content calendar
How to manage your social media content calendar
- Brainstorming
- Calendar planning
- Content creation
- Approval ladders
- Scheduling
- Moderation and community management
- Analysis and adjustment
Follow these steps to manage your monthly calendar effectively and keep your content moving smoothly through the workflow.
1. Brainstorming
You can’t force creativity into a box, but as a social media marketer you’re often tasked with brainstorming new content within a super condensed time period. Ideas are fluid and can pop into your head at the most unlikely moments, which is why we suggest keeping a running ideas list on your phone. Then you’ll have something to tap when the brainstorming phase rolls around each month.
You can also lean on brainstorming aids, like our post ideas guide — it comes with 30 days of content ideas that are specific enough to use as is, but general enough to remix for next month’s calendar as well.
Step 1: Identify cornerstone brand dates — Start by pinpointing key dates relevant to your brand, like product launches, company milestones, or major events. Use these cornerstone events to anchor your content themes and generate supporting content ideas before and after the event.
Step 2: Leverage relevant holidays — Incorporate official and unofficial holidays into your content plan. For example, a coffee shop might use National Bean Day to create engaging posts. If you’re a locally based business, mark down local and regional events as well. Check out our social media holidays list for a comprehensive rundown of important dates to put on your calendar.
Step 3: Repurpose long-form content Transform your existing long-form content, such as blog posts or podcasts, into social media-friendly formats. Don’t focus on promoting the content to deliver clicks; instead focus delivering upfront value through zero-click content that builds brand trust.
Step 4: Fill in with evergreen content ideas Finally, use evergreen content ideas to fill gaps in your calendar. Our Social Media Post Ideas Guide features 30 versatile ideas that can be mixed and matched to generate much more content over time. Or you can lean on Loomly for inspiration with out built-in Post Ideas for every day of the calendar year.
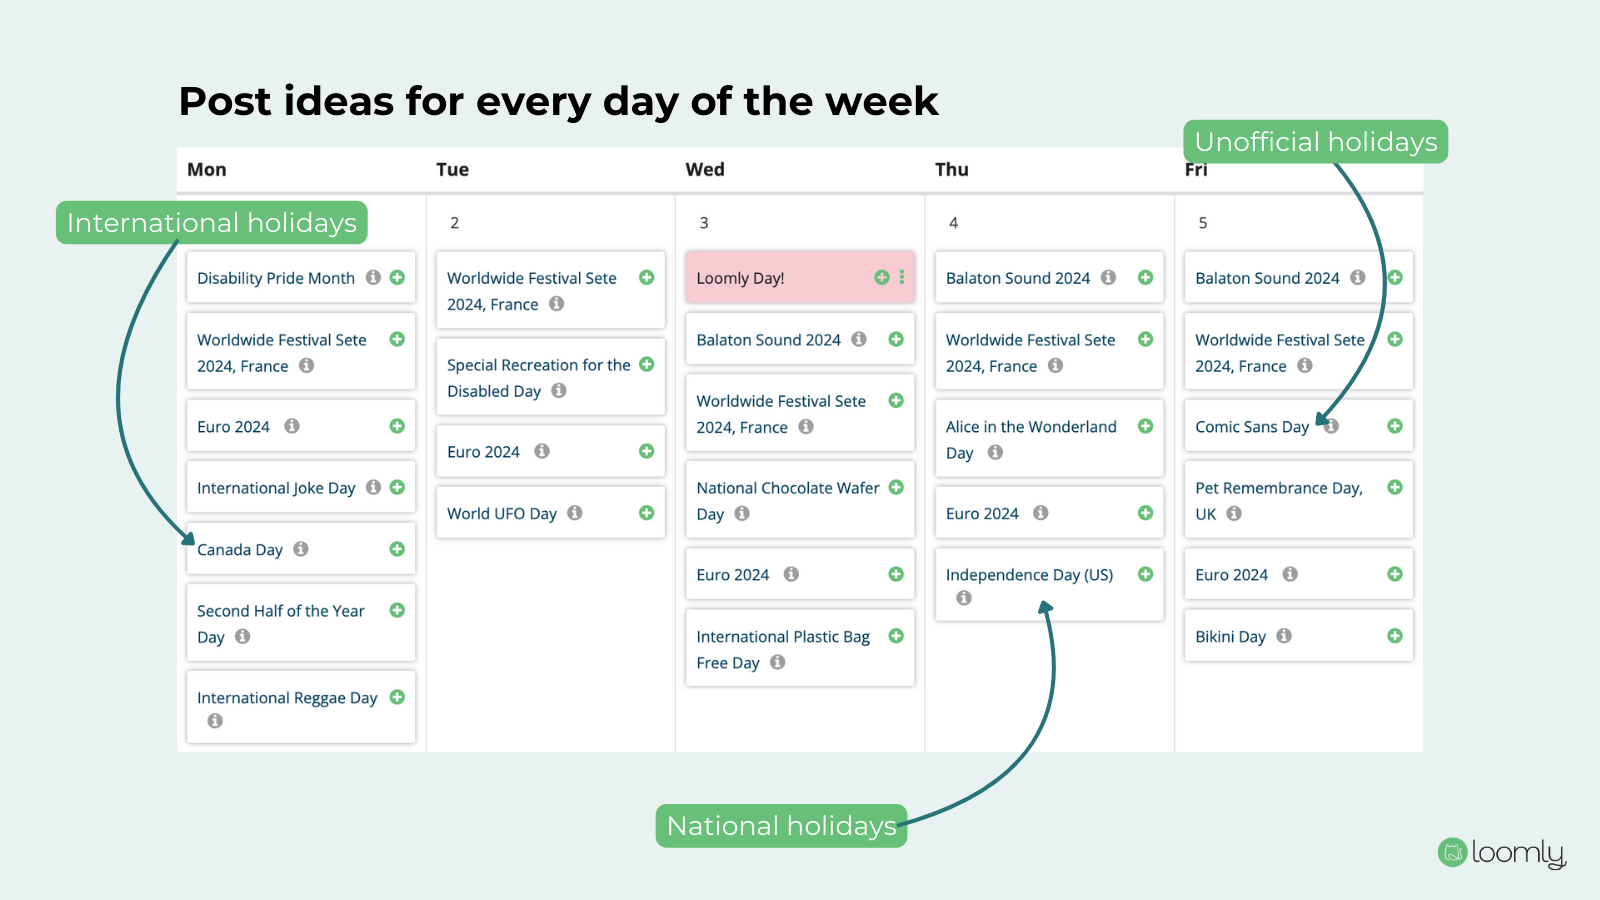 Loomly Post Ideas
2. Calendar planning
With your list of ideas in hand, the next step is to filter them through your content pillars and value pillars to align each with your overall strategy.
Start by evaluating your ideas against your content pillars. Remember, these are the whats and whys of your company. Determine which content pillars your ideas best fit into, like social proof, events and promotions, product demos, or trends. If the idea doesn’t fit your core content categories, take it back to the drawing board, or leave it on your ideas list to revisit next month. Never throw out an idea entirely — you never know if it could turn into something worthwhile down the road.
Next, refine your content by aligning it with your value pillars. Does this content educate, inspire, entertain, or relate to your audience? This step guarantees every piece of content you create will bring value to your audience and ground your content within your larger brand strategy.
At this point, decide on the social media platform and content type that will best amplify your message. You probably already have the platform and format in mind, but don’t be too rigid about your original idea. For example, if your idea is an educational how-to, you might have pictured a graphic carousel describing the steps. But you’ll want to consider the most effective format for your content; in this case, an Instagram reel might be the better fit.
After filtering your ideas through these pillars and choosing platforms and formats, you’ll have a focused monthly content plan to start actioning on. If you have multiple stakeholders or clients involved in your social media workflow, you’ll want to submit this content plan to them for finalization. If they can feedback on ideas at an early stage, it should prevent major change requests from interrupting your posting schedule down the line.
3. Content creation
The creation phase is where your social media ideas come to life. This means all the usual creative tasks, like copywriting, designing graphics, or shooting and editing videos. But the real skill you need to employ at this phase is timeline management, especially for more complex content that requires multiple revisions or external approvals.
Here are a few tips to get through the creation phase without falling victim to bottlenecks and delays:
- Repurpose: Don’t fill your entire calendar with brand new content, or you’ll burn out on production quickly. Instead, leave room for repurposing existing content that requires less effort to create but still delivers value to your audience.
- Batch content creation: For example, spend a day focusing solely on writing copy for multiple posts, or set aside time for creating all your graphics in one go. This approach not only saves time but also maintains consistency in your content.
- Add some cushion: Depending on the scope of a content piece, add some bumper days at the beginning or end of the timeline (or both). This helps you factor in unexpected bumps that almost always seem to happen.
When you’re mapping out creative timelines, don’t forget that you’ll be customizing ideas to multiple platforms. While you can reuse the majority of the content across platforms, you’ll still have to spend time resizing and polishing content to fit a particular platform’s specs and style.
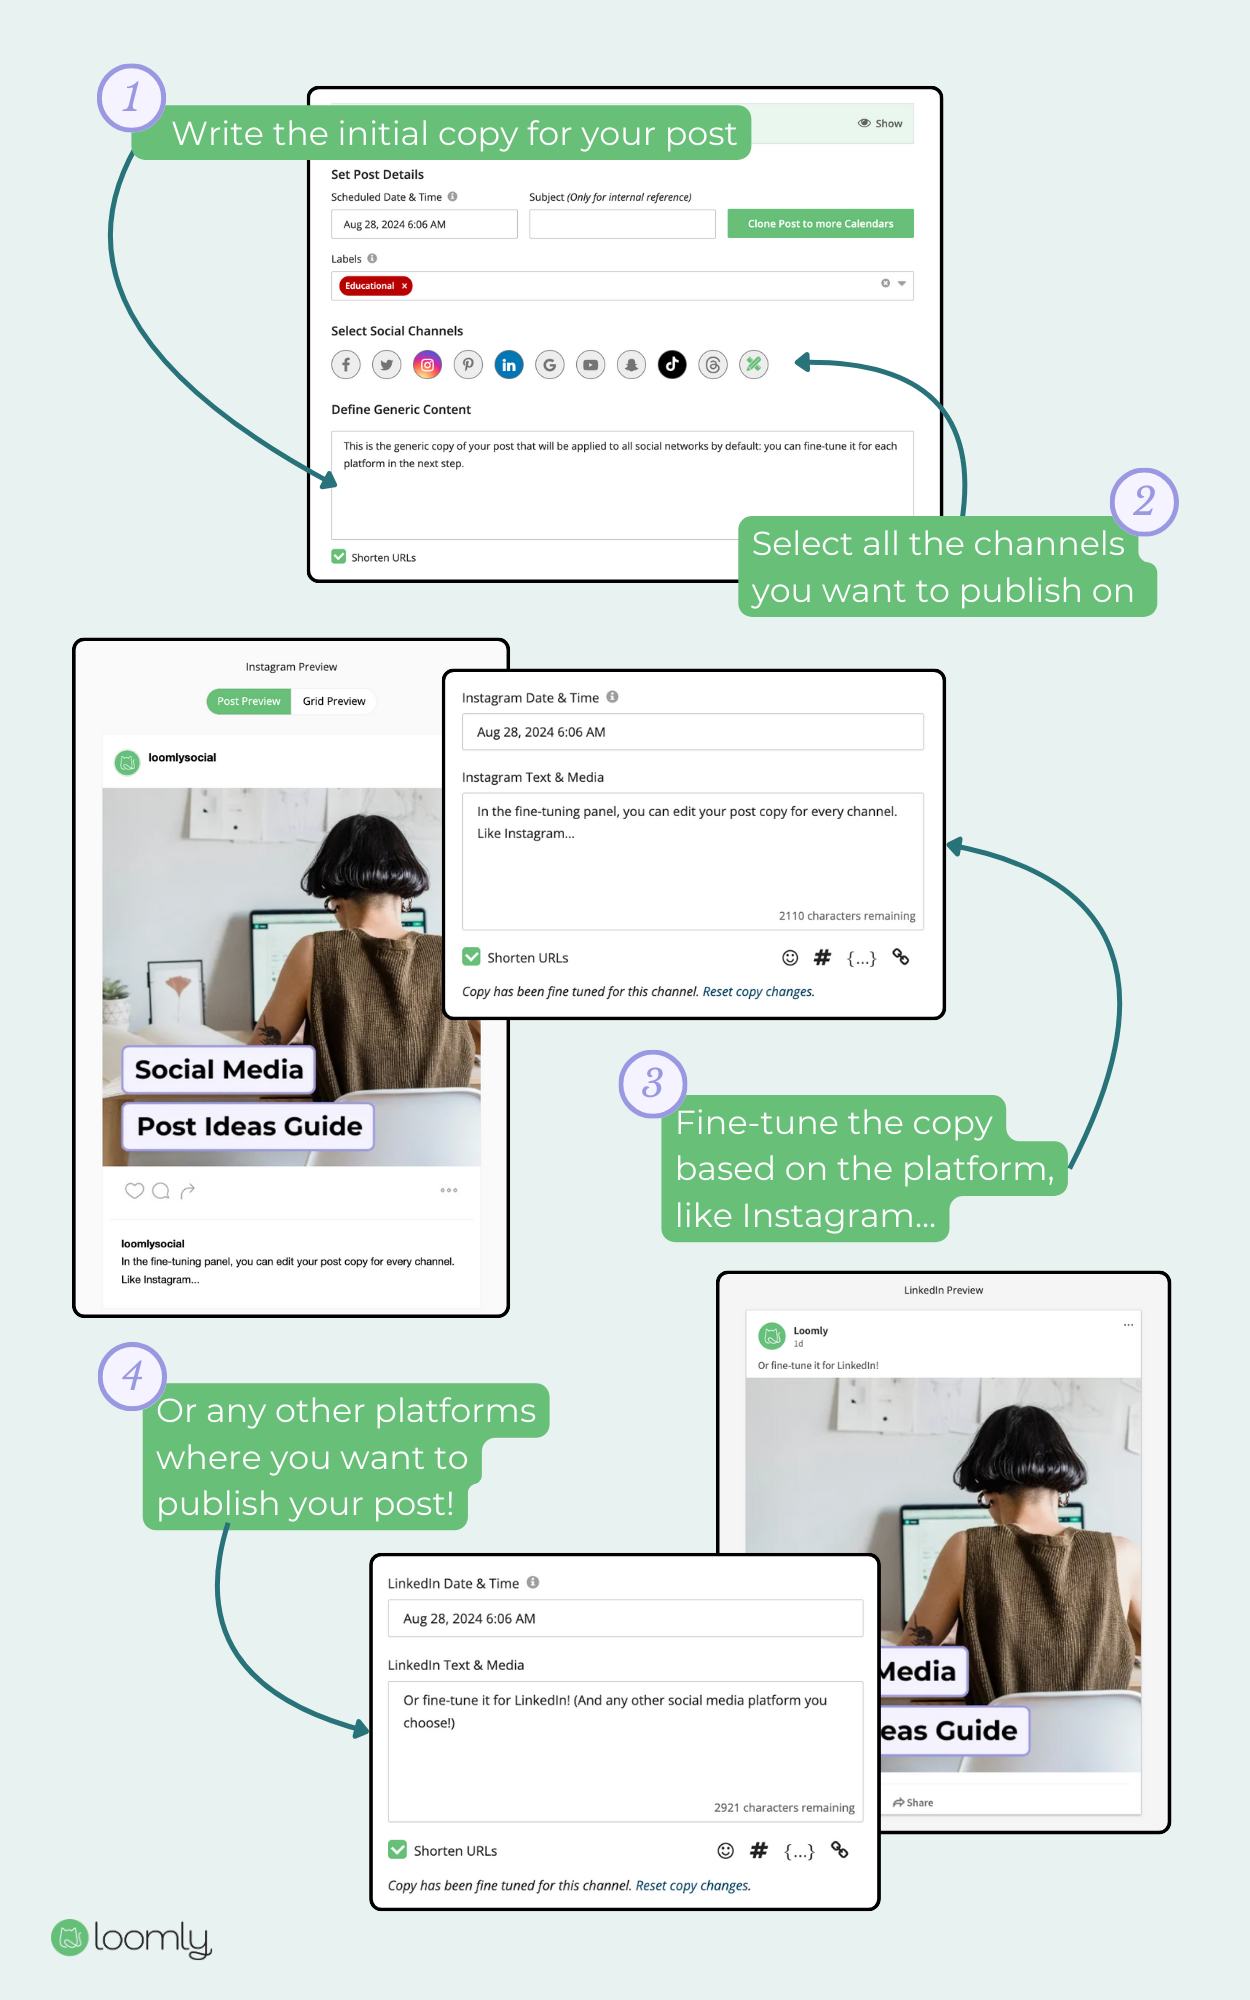 Publish the same content to multiple platforms and fine-tune your content for each one without having to build new posts
You can save precious time on this step with Loomly, which is built for multi-platform posting. Develop your core content in Post Builder, then fine-tune and schedule it quickly for the other platforms where you’ll publish. We also have a built-in library and image editing tool so you can resize images and videos to exact platform dimensions without leaving the app.
4. Approval ladders
When working in a team or with clients, establishing a clear approval workflow is essential. This process involves submitting content for review to ensure that everything aligns with the brand’s voice, objectives, and overall strategy. A well-defined approval workflow not only maintains consistency and quality but also adds a layer of accountability, preventing issues like typos, broken links, or off-brand messaging from slipping through the cracks.
Here’s how to build an approval workflow based on your team:
- If you work solo: Use a simple checklist for potential typos, broken links, incorrect visuals, and alignment with your brand's message before publishing.
- If you need approval from one collaborator: Share a checklist with the person responsible for approving posts. Clearly define approval deadlines and include buffer time for revisions.
- If you need approval from multiple collaborators: Create a chain of command in which each approver has clearly defined tasks. Final sign-off usually comes from a high-level role, who may not have the time for a detailed review. Catch those details early on so that each subsequent approver is responsible for checking fewer elements.
- If you need approval from multiple departments: Implement a comprehensive, team-wide sign-off process. This might involve your legal, marketing, editorial, and/or comms departments. An approval process this deep ensures that your content is free of any contextual risks (like being on the wrong side of a trending news item), so save it for especially sensitive or important pieces of content. Otherwise, you’ll be stuck in a never-ending approval cycle.
As your building your approvals checklist, focus on these categories of revisions:
- Consistency with brand voice: Look for on-brand messaging and tone of voice
- Compliance with brand identity: Check color scheme, logos, format, design elements, etc.
- Awareness of contextual risks: Consider any potential issues related to current events or trends
- Proofing: Double-check for any typos or errors
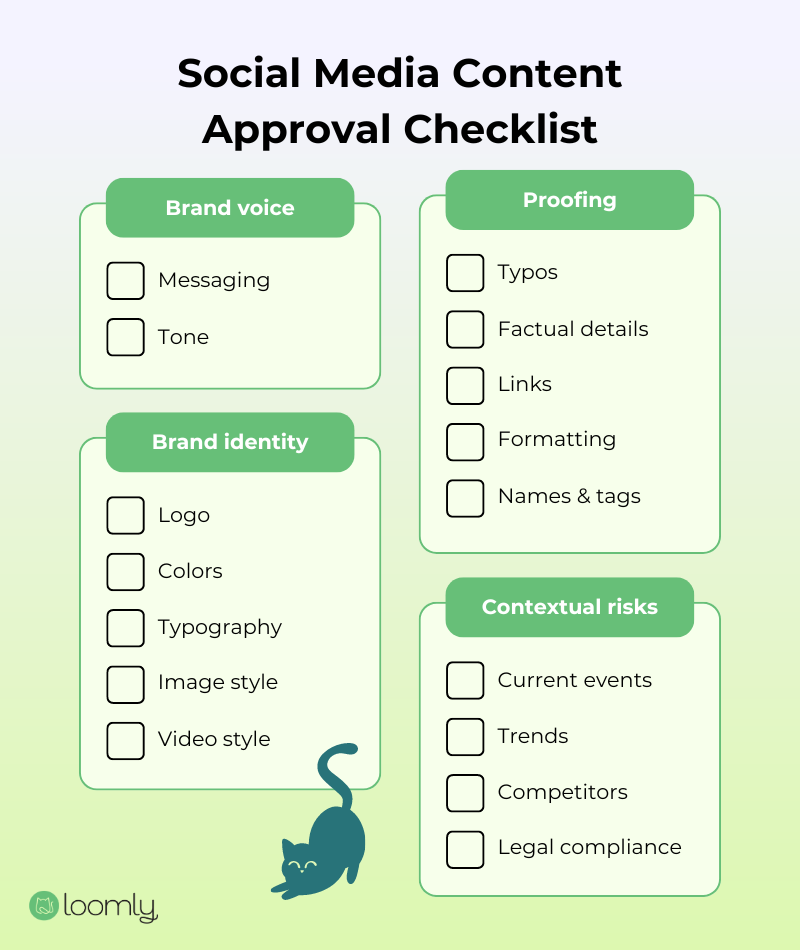
Social media approval workflow checklist
Learn more about customizing your approval workflow to fit your team, or how to implement an approval workflow that helps with client management >
5. Scheduling
When it comes to taking your approved posts from your social media content calendar to your audience, you have three main options:
Manual publishing
Check your social media calendar daily and publish posts manually. This is ideal if you’re dealing with sensitive content and prefer to review each post one last time before it goes live.
However, this approach will become a bottleneck if you have a large volume of content, if you post to more than one platform, and if you manage more than one social media account.
Calendar reminders
Set reminders in your regular calendar to alert you when a post needs to go live. This is a practical solution if you have a fluctuating schedule and can’t always check your social media calendar every day.
But, this system will crash and burn if you forget to set your reminders, or if you ignore them. Similar to manual publishing, this approach also won’t help you manage large volumes of content or multiple platforms/accounts.
Automated scheduling
Use a social media scheduling tool to schedule your posts in advance for automated publishing. This is the most efficient option as it frees you up to focus on other tasks (like content creation). A scheduler like Loomly also lets you set up different workflows and rules that will help you minimize publishing mistakes. For example, a post that is scheduled for today but hasn’t been approved yet won’t go live.
Whichever option you choose, try to align your posting schedules with your internal team’s bandwidth. Social media scheduling should take up the least amount of time in your workflow.
6. Moderating and community management
Your content is published! Now it’s time to see how your audience responds and engage with them. Community management and moderation are about actively nurturing the relationship between your brand and your audience.
The core responsibilities during the moderation and community management phase are:
- Respond to comments, messages, and mentions: Whether it’s answering questions, addressing concerns, or simply acknowledging positive feedback, these small actions build trust and community. On Loomly, you have a unified social inbox so you can track these interactions from every platform in one place.
- Monitor post success: Regularly track feedback and engagement on your posts, and be prepared to pivot when necessary. Whether it’s tweaking the tone of your responses or shifting the focus of your next piece of content, being adaptable is key to staying relevant.
- Maintain a positive and safe environment: Actively remove harmful or inappropriate content, address negative behavior, and set clear community guidelines.
- Engage proactively: Don’t wait for your audience to come to you — initiate conversations by asking questions, starting discussions, or highlighting user-generated content. Proactive engagement helps you stay top-of-mind with your audience.
7. Analysis and adjustment
Check your post performance often so you have a real-time read on metrics like engagement, reach, and video views. These quick check-ins could help you make small changes to next week’s content, and it’s always a good idea to know what’s happening in case someone on your team needs to know.
To stay on top of day-to-day metrics, look for a scheduling tool that has a social media analytics arm. Loomly shows you real-time engagement, reach, and other key performance indicators across platforms.
Track these posting variables so you can make regular adjustments:
- Post types: Are certain formats (e.g., videos, photos, or stories) getting more reach or resonating with your audience?
- Post length: Are shorter posts getting more attention, or do longer, more detailed posts perform better?
- Posting schedule: Are there specific days of the week or times of the day outside of the recommended best times to post when your posts perform significantly better?
- Platforms: Are you seeing better reach and engagement on certain platforms when you compare similar pieces of content?
- Content pillars: What topics, themes, and subjects does your audience engages with the most?
- Audience: Are there demographic or psychographic patterns in followers who consistently engage with your content?
On top of short-term analytics, set up routine social media audits at major intervals so you have data that helps you see major trends month over month, quarter over quarter, or year over year.
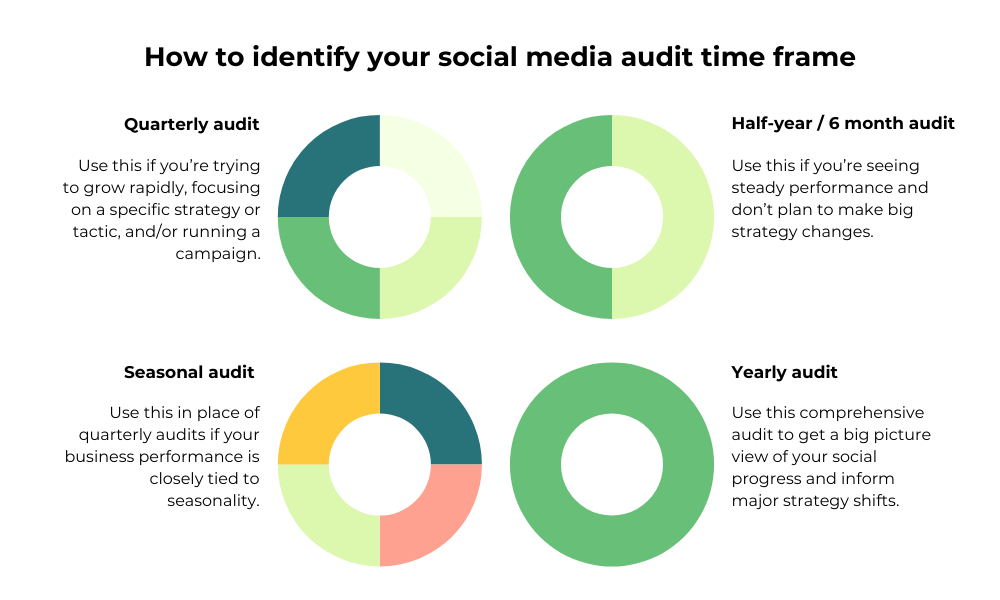 Determine when to run a social media audit
Audits are the impetus behind major shifts in your social media strategy. We suggest you implement a 5-day social media audit where you do a little bit every day. This makes the audit process less overwhelming, especially if data pulls and analysis aren’t your strongest skillset.
Rinse and repeat
Once you’ve finished your analysis phase, you start back at the beginning of the cycle with ideation. Depending on your social media cycle, you’ll probably be in various stages of the cycle at any given time.
Say you have a month-long content cycle. At the same time you’re analyzing week one’s content performance, you might be in the moderation phase for week two’s content, in the creation phase for week three’s content, and in the ideation phase for week four’s content.
Social media never sleeps, but so long as you keep everything grounded in your social media calendar, you can tackle the never-ending content demands without losing your head. Try Loomly free for 15 days and see how our tools for calendar planning, auto-publishing, community management and more can support your entire social media workflow.